Showing posts with label coOL PC trick. Show all posts

Tuesday, December 28, 2010

How to LOGIN two email ID in Gtalk


Hi gUYZZZ
I know Every one Have Two three Google Accounts?
And want to login with both of them on Gtalk on single PC?

Yaaa and today i got Perfect Trick to login two Id's in one Gtalk

How to do it:
1. Create a shortcut to GTalk on your desktop.

(if you dont have currently than).

2. Go to the properties of the shortcut. There in the target, you’ll see something like: “C:\Program Files\Google\Google Talk\googletalk.exe”

3. Add /nomutex to that target line. Then the line would be (Include the Quotes in the address) :

“C:\Program Files\Google\Google Talk\googletalk.exe” /nomutex

4. “Apply” it and then click “Ok”.

5. Check out if it works, Enjoy Multi-GTalks !

Don’t forget to leave comments here if this works…[:)]

Ur cOoL CoOL sANkEt

Sunday, December 19, 2010

Open Windows Explorer to a Different Default Directory


Open Windows Explorer to a Different Default Directory


When you open Windows Explorer (by choosing the Window key and "E" simultaneously or by choosing Start, all Programs, Accessories, Windows Explorer), you can change the directory that appears by default.
If you choose Start, all Programs, Accessories, and then right-click on Windows Explorer and choose Properties, you can modify the "Target" directory.
To go to your C: drive, type simply C:\ in the Target box and choose OK. You can also enter a shortcut key on this screen, telling Windows the character or combination of characters you want to type to automatically open Windows Explorer. You can even change the icon or specify that you always want Explorer to open up in full-screen mode.

How to Disabling Send Error Report in XP


To disable the annoying feature in WinXP which tries to send a error report to microsoft every time a program crashes you need to do this:

1. Open Control Panel
2. Click on Preformance and Maintenance.
3. Click on System.
4. Then click on the Advanced tab
5. Click on the error reporting button on the bottom of the windows.
6. Select Disable error reporting.
7. Click OK

Trick to Speed up the Start Menu


The Start Menu can be leisurely when it decides to appear, but you can speed things along by changing the registry entry

HKEY_CURRENT_USER/Control Panel/Desktop/MenuShowDelay
from the default 400 to something a little snappier. Like 0.

(to open registry go to Start->Run->type 'regedit'

How to Disable or Enable windows Task Manager


There are sometimes where your windows Task Manager get disabled by some virus, you can re-enable it, or if u wish u can disable it also, to do this follow the steps..

1. Go to Start->Run and type gpedit.msc press ok, group policy window will open.

2. In the group policy window navigate to User Configuration->Administrative Templates->System->Ctrl+Alt+Del options

3. then open Remove Task Manager, in that there are there options Not Configured, Enabled, Disabled, by default Not configured is selected

4. To enable the task manager select disabled and press ok.

5. To disable the task manager select enabled and press ok.

gOod LUck..!!!

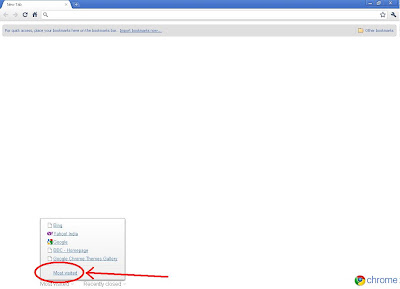
Enable and Disable Thumbnail view (Most visited / Recently Closed) on tab of Google Chrome Browser

Disable
By Default you have the thumbnail view enabled, closing or disabling this view is very simple

Step 1: just click X – close button on the right side of the Most Visited or Recently closed frame.

Step 2: After clicking it, the thumbnail view will disappear.

Step 3: Though the thumbnail view disappeared, u can access the most visited and Recently closed items through links on the left down of the page in a simple view.

Enable

And to get back thumbnail view of Most visited or Recently Closed items
Step 1: click the “Most Visited” link (text) in the left down corner

Step 2: You will have your recently visited links poped up, now click the “Most Visited” link in the poped up window.


Step 3: now the Most Visited view will be appearing in the top of the page, click the arrow on the left side of it.


Step 4: That’s it You have your thumbnail view of Most Visited items back.

Step 5: Do the same for Recently Closed items .

Thursday, December 16, 2010

Speed Up windows Vista Speed / Internet


Windows Vista is a step-up in terms of eye candy but it can slow your system down a bit. There are 2 things you can do to speed-up the Aero interface in Windows Vista:


Method 1: Disable Transparent Glass Effect

1. Click on the Desktop and select Personalize.

2. Select Windows Color And Appearance.

3. Uncheck Enable Transparency.


Method 2: Disable Windows Minimize/Maximize Animation

1. Click on the Start Menu, enter SystemPropertiesPerformance and hit Enter.

2. On the Visual Effects tab, uncheck Animate Windows When Minimizing/Maximizing.

3. Click OK.

How To make An Autorun File For USB Drives

How To make An Autorun File For USB Drives

When you plug a USB drive in, you might be interested in making a program ,or other things happen as soon as you plug in. The way you accomplish this is through the Autorun.inf file. The autorun.inf file is located in the root of the usb drive and tells Windows what to do automatically.

This autorun can be used to make good, or bad USB’s depending on what you like.

This tutorial covers:

-Creating a USB Autorun.inf
-Changing label\icon of thumbdrive
-Making a new option appear in the autorun menu
-Making programs automatically run when plugged in

So Read On...

1. Creating a USB Autorun.inf :

To create an autorun file, open Notepad and save ‘autorun.inf’’ (with quotes) and save it to the root of the drive. All it needs to have is in the first line;

[autorun]

Done!
2. Changing label\icon of thumbdrive:

Follow the steps in Creating a USB Autorun.inf. Before you save it, type this in in this order!

[autorun]

icon=myicon.ico

label=MyLabel

And save. Make sure the icon file is in the root of your drive.
3. Making a new option appear in the autorun menu:

Right, so make your autorun file and type this into Notepad:

[autorun]
icon=default
label=[yourlabelhere]
action=programname.exe
Open Program

Save it and exit. Once again, the program has to be in the root. Now, when you plug it in, the option should appear in the menu.
4. Making programs automatically run when the USB is plugged in:

Follow the same instructions, blah blah blah;

[autorun]
Icon=default
label=YourLabelHere
open=programname.exe

Wednesday, December 15, 2010

How to fool your friends when they call by saying “The Number Does not VALID”

Today i am going to show you How can we fool our friends when they call to our mobile by saying the message “The Number Doesnot VALID” or some other message based on your service provider.


Some times we don’t want to talk with a particular person so is there any way to avoid those Friends? May be you do this Tricks i,e Switch off our mobile number or Just giving some one to talk when they call and some other But this tricks all can be guessed by him. So what to do to avoid him?

So, Today i am going to give you one best Trick to avoid him by saying “The Number Doesnot VALID” when ever they call.


Steps to make to get message “The Number Doesnot VALID” whenever they call :
■This tricks is possible only for mobile users :
■Go to Call Divert option and Divert call to your Friend number to the whom you want to avoid.
For ex:If you want to avoid a person with +91944xxxxxx7 then divert Divert Call to +91944xxxxxx7
■Then see the magic whenever they call they get an error announcement saying “The Number Doesnot VALID”

Don’t forget to cancel Call Divert after cheating him otherwise all your incoming call goes to him and outgoing charges apply for you whenever they receive your call.
Enjoy your time by Avoid Talking.

Display Legal Notice on Startup of your Windows XP


If your PC has multiple users then you can now display legal notice to every user before they login to your PC. This legal notice will be displayed at every startup just before the Desktop is loaded. Using this you can tell your friends about the do’s and dont’s in your computer when they login in your absence. Well you can do this pretty easily. For this there is one small registry hack. Here is the step-by-step instruction to do this.


1. Go to Start->Run, type regedit and hit ENTER

2. Navigate to the following key in the registry


HKEY_LOCAL_MACHINE\SOFTWARE\Microsoft\Windows\CurrentVersion\policies\system

On the right side pane look for “legalnoticecaption“, double click on it and enter the desired Legal Notice Caption.

3. Next below this look for “legalnoticetext” and enter the desired Legal Notice Text. The legal notice text can be up to a page in it’s size so that it can include a set of do’s and dont’s for your computer.

4. After you do this just restart your computer and upon the next startup you can see the legal notice information for your computer. This trick works on both XP and Vista. You can also try it on Windows 7 and should work with no problems.


Hope you like this post. Pass your comments.

RUN Commands For XP

1. Accessibility Controls - access.cpl
2. Accessibility Wizard - accwiz
3. Add Hardware Wizard - hdwwiz.cpl
4. Add/Remove Programs - appwiz.cpl
5. Administrative Tools - control admintools
6. Automatic Updates - wuaucpl.cpl
7. Bluetooth Transfer Wizard - fsquirt
8. Calculator - calc
9. Certificate Manager - certmgr.msc
10. Character Map - charmap
11. Check Disk Utility - chkdsk
12. Clipboard Viewer - clipbrd
13. Command Prompt - cmd
14. Component Services - dcomcnfg
15. Computer Management - compmgmt.msc
16. Control Panel - control
17. Date and Time Properties - timedate.cpl
18. DDE Shares - ddeshare
19. Device Manager - devmgmt.msc
20. Direct X Troubleshooter - dxdiag
21. Disk Cleanup Utility - cleanmgr
22. Disk Defragment - dfrg.msc
23. Disk Management - diskmgmt.msc
24. Disk Partition Manager - diskpart
25. Display Properties - control desktop
26. Display Properties - desk.cpl
27. Dr. Watson System Troubleshooting Utility - drwtsn32
28. Driver Verifier Utility - verifier
29. Event Viewer - eventvwr.msc
30. Files and Settings Transfer Tool - migwiz
31. File Signature Verification Tool - sigverif
32. Findfast - findfast.cpl
33. Firefox - firefox
34. Folders Properties - control folders
35. Fonts - control fonts
36. Fonts Folder - fonts
37. Free Cell Card Game - freecell
38. Game Controllers - joy.cpl
39. Group Policy Editor (for xp professional) - gpedit.msc
40. Hearts Card Game - mshearts
41. Help and Support - helpctr
42. HyperTerminal - hypertrm
43. Iexpress Wizard - iexpress
44. Indexing Service - ciadv.msc
45. Internet Connection Wizard - icwconn1
46. Internet Explorer - iexplore
47. Internet Properties - inetcpl.cpl
48. Keyboard Properties - control keyboard
49. Local Security Settings - secpol.msc
50. Local Users and Groups - lusrmgr.msc
51. Logs You Out Of Windows - logoff
52. Malicious Software Removal Tool - mrt
53. Microsoft Chat - winchat
54. Microsoft Movie Maker - moviemk
55. Microsoft Paint - mspaint first
56. Microsoft Syncronization Tool - mobsync

57. Minesweeper Game - winmine
58. Mouse Properties - control mouse
59. Mouse Properties - main.cpl
60. Netmeeting - conf
61. Network Connections - control netconnections
62. Network Connections - ncpa.cpl
63. Network Setup Wizard - netsetup.cpl
64. Notepad notepad
65. Object Packager - packager
66. ODBC Data Source Administrator - odbccp32.cpl
67. On Screen Keyboard - osk
68. Outlook Express - msimn
69. Paint - pbrush
70. Password Properties - password.cpl
71. Performance Monitor - perfmon.msc
72. Performance Monitor - perfmon
73. Phone and Modem Options - telephon.cpl
74. Phone Dialer - dialer
75. Pinball Game - pinball
76. Power Configuration - powercfg.cpl
77. Printers and Faxes - control printers
78. Printers Folder - printers
79. Regional Settings - intl.cpl
80. Registry Editor - regedit
81. Registry Editor - regedit32
82. Remote Access Phonebook - rasphone
83. Remote Desktop - mstsc
84. Removable Storage - ntmsmgr.msc
85. Removable Storage Operator Requests - ntmsoprq.msc
86. Resultant Set of Policy (for xp professional) - rsop.msc
87. Scanners and Cameras - sticpl.cpl
88. Scheduled Tasks - control schedtasks
89. Security Center - wscui.cpl
90. Services - services.msc
91. Shared Folders - fsmgmt.msc
92. Shuts Down Windows - shutdown
93. Sounds and Audio - mmsys.cpl
94. Spider Solitare Card Game - spider
95. SQL Client Configuration - cliconfg
96. System Configuration Editor - sysedit
97. System Configuration Utility - msconfig
98. System Information - msinfo32
99. System Properties - sysdm.cpl
100. Task Manager - taskmgr
101. TCP Tester - tcptest
102. Telnet Client - telnet
103. User Account Management - nusrmgr.cpl
104. Utility Manager - utilman
105. Windows Address Book - wab
106. Windows Address Book Import Utility - wabmig
107. Windows Explorer - explorer
108. Windows Firewall - firewall.cpl
109. Windows Magnifier - magnify

110. Windows Management Infrastructure - wmimgmt.msc first

xHidden Browser in Microsoft Windows XP

Suppose you are working on a PC that has Internet Explorer blocked, but you need to access the internet. Do you want to know the sneaky, double agent method of accessing the internet?


There is a hidden internet browser in the HTML Help Component, accessible from a variety of places. One such place is the standard calculator available to Windows XP (at least). Open the calculator by clicking:


◦Start
◦All Programs
◦Acessories
◦Calculator
◦Help
◦Help Topics

If you then click to the far left of the title bar, you’ll see an option to Jump to URL… – take that. Type in the URL of the website you want to visit, but note that you need to supply the “http://” part or this will not work.


Hey presto – a browser in the right hand pane of the help program. This is Internet Explorer embedded inside the HTML Help application. You may find that Adobe Flash doesn’t work in your hidden browser, but a quick visit to the Adobe site should sort that out.

How to Install Windows From Usb Drive

Windows 7 can run on machines with lower specs than required for Windows Vista, and many users are actually finding it runs better than Windows XP on lower spec machines. It’s also ideal to run on newer netbook machines, but unfortunately many of these do not include a DVD drive so how do you install windows 7 on a machine without a DVD drive?


I spent yesterday researching this exact problem and I managed to install Windows 7 on my LG X110 netbook in around 20 minutes using a 4GB USB Drive. Setting up the USB drive to install Windows 7 was fairly easy in the end, and the installation was quicker than a DVD drive, so this method is perfect if you want to install Windows 7 quickly on several machines.

How To Install Windows 7 From A USB Drive

1.Find a standard 4GB USB Drive and plug it into your machine
2.Click Start in your enter ‘cmd’ in the run field. Once cmd is open type in ‘diskpart’ and a new window will open
3.In the new diskpart window type:

■‘list disk’ : This lists all the disk drives attached to your machine
■Look for your USB drive and note the number and then type: ’select disk #’, where ‘#’ is your USB disk number
■then type ‘clean’
■then type ‘create partition primary’
■then ’select partition 1′
■then ‘active’
■then ‘format fs=fat32 quick’


Once you’ve finished these steps you then need to copy your Windows 7 files to the USB. To do this you have to mount your Windows 7 ISO as a virtual DVD. Doing this is easy:


1.Install MagicDisk (MagicDisk.com)
2.once installed, right-click on MagicDisk in your system tray Click on ‘Virtual CD/DVD-Rom’, select your DVD drive
3.then ‘Mount’ and in the dialog window that opens up, select your Windows 7 ISO
4.Now in windows Explorer, click on your DVD drive and you should see all the Windows 7 Files. All you have to do now is copy and paste all the files to your USB key and you have a Windows 7 USB Installation Stick!
5.Install the stick in the PC you want to install Windows 7 on and boot up. Remember to change your bios to allow booting from USB

If you follow the steps above then you should have no problems installing Windows 7 from a USB key

How to add Application To Right Click Menu Of Folders

Playing with registry is one of my hobby. Today I am going to explain you a nice way to add any application to the right click menu of folders in Windows by editing registry. It might be useful for you as you can open your most frequently used applications just by right clicking on folders. So lets start.


I will add Notepad to right click menu of folders here. You can add any other application that you use most frequently using this method.


1.First of all open registry editor. To open registry editor press Ctrl+R. Now type regedit in RUN window and press enter.

2.Now go to HKEY_LOCAL_MACHINE -> SOFTWARE -> Classes -> Folder -> shell.

3.Right click on shell and make a new Key. You can name it anything. I will name it as notepad.

4.Now right click on newly created key (notepad) and create a new key value again and name it as command.

5.Under command key value craete a new String Value by right clicking anywhere under commend key.

6.Double click on new String Value and change its Value data. If you want to make shortcut to notepad then its Value data will be – C:\Windows\System32\notepad.exe

7.Close the registry editor. Now right click on any folder to see the changes

How to find windows xp key in cd

was just Right Under you Nose. Lets see how easily you can get it…


Find Windows XP CD key inside your Windows XP CD

To get the Windows XP CD key, you have to do the following steps. Just follow the following steps and find Windows XP cd key into your windows XP CD.

Steps to follow to find Windows XP CD key:


1. Bring your Windows XP CD and insert it into your computer’s CD/DVD ROM/ RAM.
2. Now, browse your Windows XP CD and find the folder I386.
3. Inside I386 folder, find the file named as unattended.txt.
4. Open unattended.txt by using notepad.
5. At last, keep scrolling of the opened file and you will get Windows XP CD key

Saturday, December 11, 2010

How Disk Cleanup Works


Performing a disk cleanup regularly is a good idea. Whenever you "surf the internet", open attachments, delete files, your computer saves a record of your activity. Many of these files are harmless, and individually are very small. But if you spend a lot of time on your computer, before long you'll take up enough space to slow your computer down a bit.

Disk Cleanup is a Windows utility that helps keep unused and unwanted files from taking up extra storage space on your computer. You can think of it as "spring cleaning” for your computer.

Basically, it removes files that may have once been useful or used but now are just taking up extra room that could be used for more useful programs and files.

To perform a disc cleanup, click on the Start button on the bottom left of your computer screen, then Programs, Accessories, System Tools, Disc Cleanup. A small box will pop up, allowing you to select the files to delete (most files are OK to delete, but if you are unsure, it is best to not select the file). Then click OK, and the unused files will be removed.

If you've never done a disk cleanup on your computer, now is a good time to get started. Then, depending on how much you use your computer, you can perform a disk cleanup every few weeks to keep your computer running smoothly!

What is Spyware How to Remove


Spyware is a menace to any computer, but there are many free Spyware removal products online to help out.

It sounds rather sinister, doesn't it? In a way, it really is. Spyware (another name for Malware or Adware, which is Internet-speak for "advertising supported software") enters your computer without your explicit consent. You see, Spyware normally comes packaged with other programs, which you do want and actually choose to download. If you aren't too cluey about how to detect Spyware in a potential download (and let's face it, who is), you simply won't know that you've downloaded and activated the Spyware software.

What does Spyware do? It collects information about you and your business or organization to help advertising companies place better targeted advertising copy on the websites you visit. That is, advertising that may actually be of interest to you. OK, in theory, it's a reasonable idea. You are going to be surfing anyway and these days websites survive thanks to their advertising, so wouldn't you rather see ads that may be of some relevance to you? For example, if you are sitting at a computer in New York, Spyware will tell advertisers your geographical position and hence target ads that are relevant to New Yorkers (restaurants and stores in the area or events taking place in the area). If you happen to visit the same website from Paris, those ads will be French ads.

How does Spyware work? Once the software program sneaks into your computer (via some download you've made, for example, Kazaa) it follows you around as you surf the net. It collects information about you from your hard drive. It sounds illegal doesn't it? Well, it isn't. Not yet anyway.

There are lots of ways to protect your computer from this menace. Spyware removal programs help you track Spyware and purge your system of the software. Try an Internet search for Free Spyware Removal or Free Spyware Removal Program. This will bring up various results including the Lavasoft's Ad-Aware program, which is the most popular. Some websites will also offer you a Free Spyware Removal or Adware Removal online.

Written by: Dean Erickson

Friday, December 10, 2010

‘Do Not Track’ Feature in Internet Explorer 9


Privacy advocates have beeen asking the browsers to provide users the ability to block tracking their information by advertisers. Websites use many third-party advertising partners, and some may use shady surveillance schemes, perhaps without the knowledge of the websites.

Internet Explorer 9 will let users add lists of sites that they don’t want tracking them. Users will have to create or find their own lists of sites they want to block. The feature won’t be automatically turned on when it debuts with the release of Internet Explorer 9 early next year.

It has been demanded Microsoft to work directly with privacy groups to identify and create lists of sites that engage in controversial forms of tracking, instead of giving the total responsibility to the user. But Microsoft takes the stand that, it doesn’t want to judge which sites are OK to track consumers.

Thursday, December 9, 2010

Download YouTube videos easily


is a desktop application to view, download and convert YouTube videos. It support many audio and video formats including VCD/DVD, MPG, AVI, MP3, 3G, MP4 and the converted videos can be playable on your iPhone, Mobile Phones, MP4 Player, iPod, PSP etc. With ZillaTube, you can extract audio from YouTube videos.

ZillaTube is available for computers running on Windows XP, Vista, Windows 7 Operating Systems.

Features of ZillaTube


* Download YouTube videos easily, and store them in your computer permanently.

* View YouTube videos conveniently and instantly on your PC.

* Convert YouTube to high-quality Audio/Video formats such as VCD/DVD, MPG, AVI, MP3, 3G, MP4 & more.

* Play-back those converted videos on your iPod, Phone, PSP, MP4 player, etc, and view those clips with friends and family.

* Download more reliably, and at faster speed.

How to download YouTuUbe videos and save in your computer?

Step 1: Copy YouTube’s URL

To download a video file, just copy the URL provided by YouTube, as shown below. For example, a typical URL could be http://www.youtube.com/watch?v=lof7Yq85ynE

Step 2: Paste the URL into ZillaTube

Paste the URL into ZillaTube program as shown below:

Then click the “Download YouTube Video” button.

You will be asked where to save the file, you may just select “desktop” for convenience, or any preferred location.
2. Opening the downloaded video file.

Upon completion of the file download, just drag and drop it into the Drop-Box area of ZillaTube program.

ZillaTube will automatically start playing the file in a separate preview window.

Soon, you will be notified by a message “File Accepted, Ready for Conversion” appearing in the drop-box area, indicating that it is now ready to perform video conversion.

At this time, you may choose to convert the movie. You do not have to wait for the movie-playing to complete. However, before performing the conversion, it is recommended that the preview window is closed by clicking on its “close button” at the top-right-corner of its window. This may speed up the conversion process.

You may also choose one of the four conversion modes ( for example- PC, Music, VCD/DVD, or Mobile Devices ), and adjust the preferred conversion settings. By default, the PC conversion mode is selected.

Download screenshot software

Zscreen is an open-source program for screen capture functions in Microsoft Windows. It can be used to upload screenshots, pictures, texts and other files along with URLs.

You do need the .NET 3.5 framework to run ZScreen, but the installer will automatically download it and install it for you if you do not have it.
Features of Zscreen

* 3 Screen capture options – Active Window (Alt+PrintScreen), Crop Shot (capture a specific region with Ctrl + PrintScreen) and Entire Screen (PrintScreen).

* Upload to Image Hosting Services – Zscreen lets you to upload to your personal accounts in Tinypic, Imageshack and other custom places with Custom Uploader.

* Image Editor – The built-in image editor lets you to annotate your screenshots as you wish.

* Localhost Accounts – This feature helps you to host screenshots in a shared folder, thereby sharing the file URL with work colleagues.

* Portability – You can run Zscreen from a USB drive

* Multiple monitor support – From version 2.6.7.1 onwards, multiple monitor support is available.

* Watermarks – This feature allows you to use text or image watermark.

* Hot keys for easy access to all major functions.

* Auto-update via code.google.com